
 Admin
Admin
Getting Started with Microsoft Word 2010
Microsoft Word 2010 is one of the most widely used word-processing applications for creating, editing, formatting, and printing documents. Whether you want to write a letter, prepare a school assignment, create a business report, design a resume, or prepare an official document, Microsoft Word provides the tools you need.
In this chapter, we will learn how to start Microsoft Word 2010 from a Windows computer. The process is simple, but understanding each step is useful, especially if you are new to Microsoft Office.
Before you begin, make sure that Microsoft Office 2010 is already installed on your computer. If Word 2010 is not installed, these steps will not work until the application has been installed.
What You Need Before Starting
- A Windows computer.
- Microsoft Office 2010 installed on the computer.
- A working keyboard and mouse or touchpad.
- Access to the Windows Start menu.
Once you have confirmed that Microsoft Office 2010 is installed, you can follow the steps below to launch Microsoft Word 2010.
Step 1: Click the Start Button
The first step is to open the Windows Start menu. The Start menu provides access to programs, settings, files, and other features installed on your computer.
Move your mouse to the Start button located at the bottom-left corner of the Windows desktop. Click the Start button once to open the Start menu.
If you are using a keyboard, you can also press the Windows key on your keyboard to open the Start menu.
The appearance of the Start menu may vary slightly depending on the version and configuration of Windows you are using.
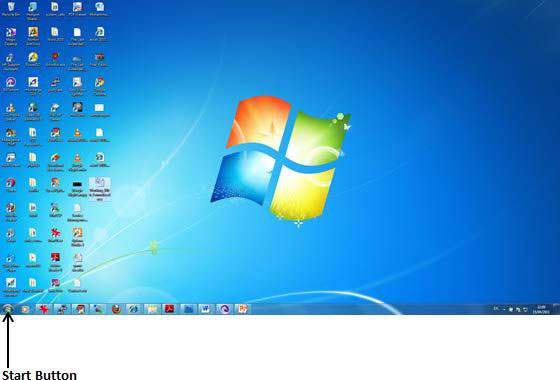
What happens after clicking Start? A menu will appear containing shortcuts to applications and different Windows options. From this menu, you need to locate the list of installed programs.
Step 2: Open All Programs
After opening the Start menu, look for the All Programs option. This option displays the applications installed on your Windows computer.
Move your mouse over or click All Programs. Windows will display a list of installed applications and folders. Because Microsoft Office is normally grouped inside its own folder, you need to find the Microsoft Office folder in this list.
Depending on the number of applications installed on your computer, the program list may be quite long. You may need to scroll through the list until you find Microsoft Office.
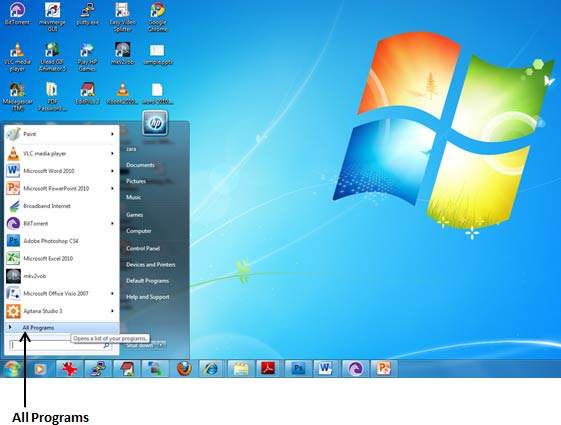
Important: Do not confuse the Microsoft Office folder with another Microsoft application. The folder should contain several Office programs such as Word, Excel, PowerPoint, and other Office utilities.
Step 3: Find Microsoft Office
Once you have opened All Programs, locate the Microsoft Office folder. This folder contains the applications that were installed as part of Microsoft Office 2010.
Move your mouse pointer over Microsoft Office or click the folder. A submenu will appear containing the different Microsoft Office applications available on your computer.
You may see applications such as Microsoft Word, Microsoft Excel, Microsoft PowerPoint, Microsoft Access, and other Office tools depending on the edition of Microsoft Office 2010 installed on your PC.
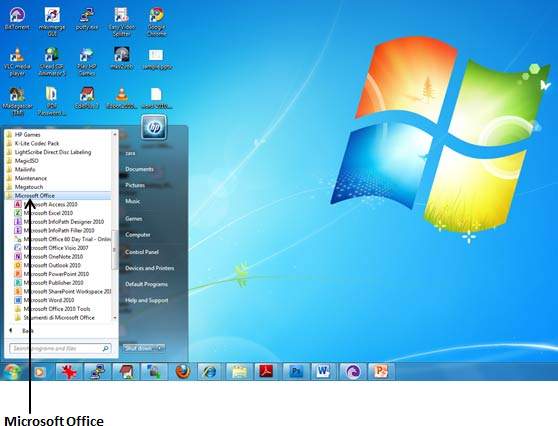
At this stage, you have successfully navigated from the Windows Start menu to the Microsoft Office program group. The next step is to select the specific application you want to use.
Step 4: Select Microsoft Word 2010
Inside the Microsoft Office submenu, look for Microsoft Word 2010. This is the application used for creating and editing text documents.
Click Microsoft Word 2010 once. Windows will begin launching the application. Depending on the speed of your computer, Word may take a few seconds to open.
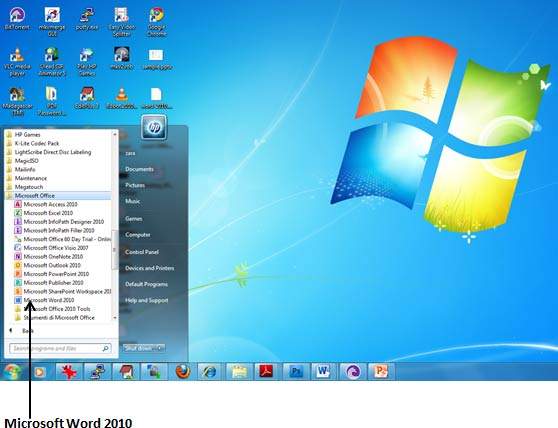
While Word is loading, avoid repeatedly clicking the application icon because this can sometimes result in multiple Word windows being opened.
When Microsoft Word finishes loading, you will be presented with the main Word interface where you can create a new document or open an existing document.
Step 5: Microsoft Word 2010 Opens
After selecting Microsoft Word 2010, the application will launch. The main Word window contains several important areas that allow you to create, edit, format, save, and manage documents.
The first screen normally provides a blank document or access to templates, depending on how Word is configured. A blank document gives you a clean page where you can start typing immediately.
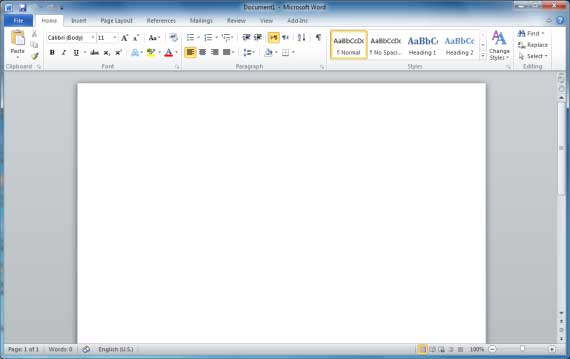
Understanding the Microsoft Word 2010 Window
Opening Word is only the beginning. To use the application effectively, it is important to understand the major parts of the Word interface.
1. Title Bar
The Title Bar appears at the top of the Word window. It displays the name of the current document and the Microsoft Word application name.
2. Quick Access Toolbar
The Quick Access Toolbar provides quick access to commonly used commands such as Save, Undo, and Redo. You can customize this toolbar according to your needs.
3. File Tab
The File tab is used for document management. From here, you can create a new document, open an existing document, save a document, print it, and access Word options.
4. Ribbon
The Ribbon contains the commands and tools used to work with your document. Commands are organized into tabs such as Home, Insert, Page Layout, References, Mailings, Review, and View.
5. Document Area
The Document Area is the main working space where you type and edit your content. When you create a new blank document, this area displays a white page where you can begin entering text.
6. Status Bar
The Status Bar is located near the bottom of the Word window. It can display information such as the current page number, word count, language, and document status.
What Can You Do After Opening Word 2010?
Once Microsoft Word 2010 is open, you can perform many different tasks. For example, you can:
- Create a new document.
- Type and edit text.
- Change fonts and font sizes.
- Make text bold, italic, or underlined.
- Change text alignment.
- Create numbered and bulleted lists.
- Insert pictures and shapes.
- Create tables.
- Add headers and footers.
- Insert page numbers.
- Check spelling and grammar.
- Save documents to your computer.
- Print documents.
- Open and edit previously saved documents.
Useful Keyboard Shortcuts for Beginners
Learning a few keyboard shortcuts can make working with Microsoft Word much faster.
| Shortcut | Action |
|---|---|
| Ctrl + N | Create a new document |
| Ctrl + O | Open a document |
| Ctrl + S | Save the document |
| Ctrl + P | Print the document |
| Ctrl + C | Copy selected text |
| Ctrl + V | Paste copied content |
| Ctrl + X | Cut selected content |
| Ctrl + Z | Undo the previous action |
| Ctrl + Y | Redo an action |
| Ctrl + A | Select all content |
If Microsoft Word 2010 Does Not Appear
If you cannot find Microsoft Word 2010 in the Start menu, there are several possible reasons. Microsoft Office may not have been installed correctly, the shortcut may have been removed, or the program may be located somewhere else on the computer.
You can try using the Windows search function and type Microsoft Word. If Word is installed, Windows may display it in the search results.
If the application cannot be found at all, check whether Microsoft Office 2010 is installed through the Windows Programs and Features section.
If Word Takes Too Long to Open
Older computers may take longer to launch Microsoft Word. Close unnecessary applications and wait for Word to finish loading. If Word repeatedly freezes or crashes, restarting the computer may help.
You should also ensure that your computer has sufficient free storage and system resources. Running many applications simultaneously can reduce performance.
Beginner Tips for Using Word 2010
- Save your work frequently: Use Ctrl + S regularly so you do not lose important changes.
- Use meaningful file names: Instead of names such as Document1, use descriptive names such as School_Assignment.docx.
- Learn keyboard shortcuts: Shortcuts can significantly improve your productivity.
- Keep your documents organized: Store related documents inside clearly named folders.
- Use formatting carefully: Avoid using too many fonts, colors, and unnecessary effects in professional documents.
- Preview before printing: Always check page layout and margins before sending a document to the printer.
Conclusion
Starting Microsoft Word 2010 is a straightforward process. You simply open the Windows Start menu, select All Programs, locate Microsoft Office, and then select Microsoft Word 2010.
After Word opens, you can begin creating documents, editing text, inserting images, creating tables, formatting content, saving files, and preparing documents for printing.
Although Microsoft Word 2010 is an older version of Word, learning its basic interface and document workflow provides a useful foundation for understanding later versions of Microsoft Word as well.
Do not stop after learning how to open Microsoft Word. The next important skill is learning how to create, format, save, and manage your first document. Understanding these basics will make it much easier to work with Word professionally and efficiently.
What You Will Learn Next
In the next chapter, we will continue from where we stopped and learn how to work with a new Word document. You will learn how to create a document, type text, select text, edit content, format paragraphs, save your work, and use essential Word tools.
Next: Creating and Working With a New Document in Microsoft Word 2010.

Comments
Post a Comment